31/10/2013

Black Vinegar Pig's Totter -- Tkee Ka Chor


Hi there,

Today, mummy decided to cook "Black Vinegar Pig's Totter", (or in Hokkien "tkee ka chor" , or Cantonese "chee keok choh") one of my favourite dishes which I have come to love very much. It has a sweet-sourish sauce full of meaty goodness and a lot of collagen which is very good for arthritis and rheumatism  in old people. To cook this dish, you must have the black vinegar sauce, pig's totter  (half totter for two people and the whole leg for a family), good ginger (Bentong's the best), a bit of sesame oil and rock sugar for sweetness.

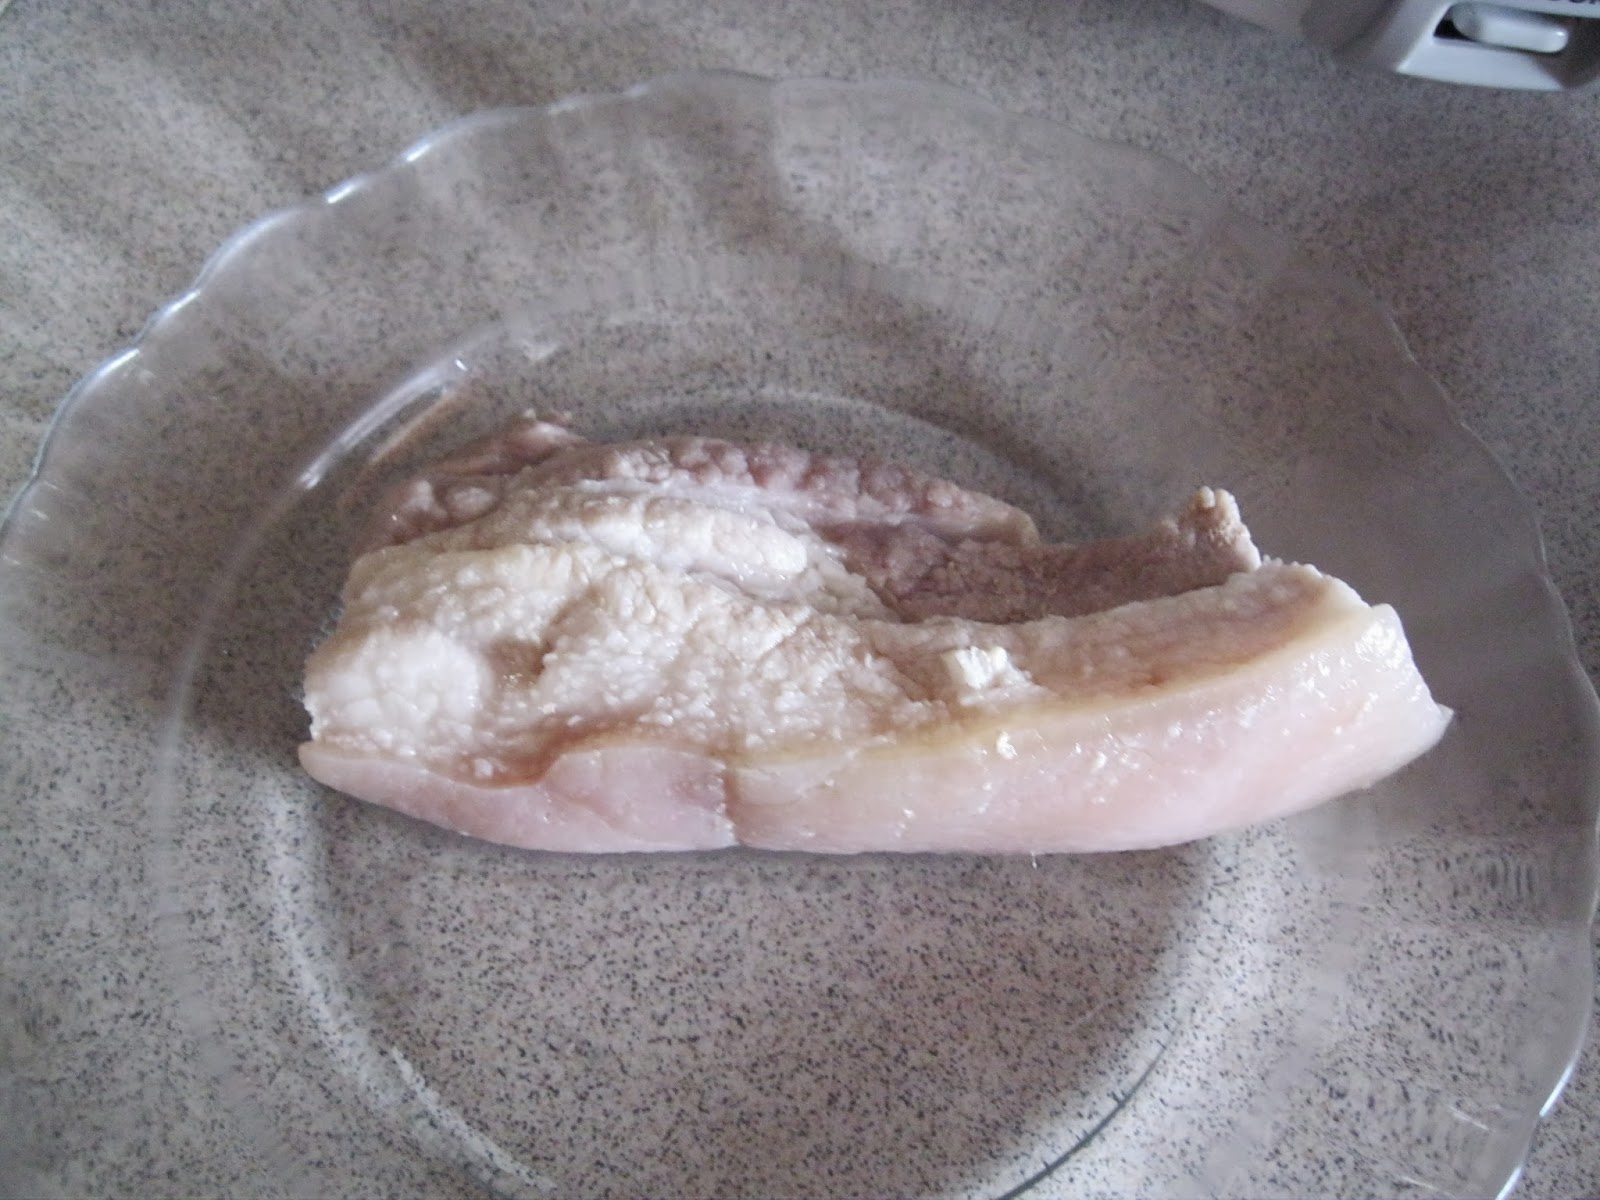
The first thing is to clean the pig's totter which the butcher had cut into bite sizes. Clean the pieces under running water to remove small fragments of bone from the chopping. Use an old shaver to remove any hair remaining on the skin.  After that put the chopped pieces aside.

Picture 1.  This is half a pig's totter cut into bite sizes. There are small fragments of bones sticking on the bones and these must be removed so that you may enjoy eating the meat.
Beside the pig's totter, you must have a bottle of sweeten black vinegar, a small bottle will do, some old ginger, crushed with the pestle, or the cleaver whichever is handy and some rock sugar to taste.

Picture 2.  The picture shows some old gingers, with one piece crushed (inside the bowl) with the pestle on the left side of the picture.  There is a small bottle of the black vinegar in the centre of the picture. You can get this from any Chinese sundry shop. You only need to use about a cup of it. The rest you just add water.
Method:

You need to fry the crushed ginger with sesame oil, to give it the desired aromatic smell and taste. get a good sesame oil. We always buy "Ghee Hiang Sesame Oil". We don't trust any other brand.

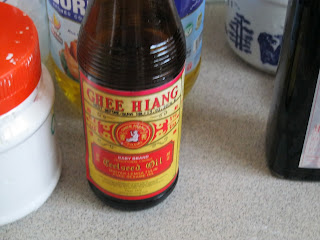
Picture 3. This is the bottle of the branded sesame oil which we trust. Use about 3 to 4 tablespoonful of the oil to fry the old ginger. Do not let the oil burnt. Control the fire.
Picture 4.  Fry the crushed old ginger in sesame oil until aromatic. Medium heat should be sufficient. When the ginger is done, add in the meat and sear every piece to seal in the flavour.
Picture 5.  Add in the pieces of meat and fry. Try to sear every piece of meat. Again use medium heat. When the meat is done, then pour in about one cup of black vinegar, depending on the amount of meat. More meat, more black vinegar.
This is a crucial stage where the meat need to be seared for better flavour.  Other people say that it was not necessary to sear the meat, just fry it. You can try both ways. There is no hard and fast rules. Either way, you can still eat them. You may not even taste the difference.

Picture 6.  Black vinegar is added at this stage. Notice the meat pieces are cooked. Use about one cup of vinegar, then pour in about half a litre or more of plain tap water, enough to cover all the meat.
Use only one cup of the black vinegar and then pour in enough tap water to cover the meat. Let it boil for a while. Then transfer the whole thing into a "Vision Stock Pot" to simmer for about one and a half hours or 90 minutes.

Picture 7. Tap water is add and then let the whole thing boil for some time. Too much water will dilute the sauce and it would not be nice to drink as soup. Rock sugar is added at this stage. You can also add the rock sugar later when the whole thing is being cooked slowly on the electric cooker.
After a short while, scoop the whole thing into a "Vision Stock Pot" and place it on an electric cooker to let it simmer for 90 minutes.

Picture 8.  You can buy rock sugar from the supermarket and store it in a plastic bottle to be used later.
Picture 9. Scoop the whole thing into the stock pot and cook it on an electric cooker.
When you buy the rock sugar, pick the smaller pieces for easy cooking. The rock sugar is quite hard and difficult to break apart. When you choose the smaller pieces, it will save you the trouble of having to break it up. We don't buy the China ones even though they come in small pieces because they don't taste so nice. So we buy the local ones.

Picture 10.  Set the electric cooker to high and let the whole thing boil for about five minutes. After that lower the heat and let it simmer for 90 minutes or until the meat is soft. At this stage, you can add more rock sugar if the sauce is not sweet enough.
After the meat is cooked, you can switch off the cooker and it is ready to be served. Serve the dish while it is still hot. The sauce taste very nice when it is hot.

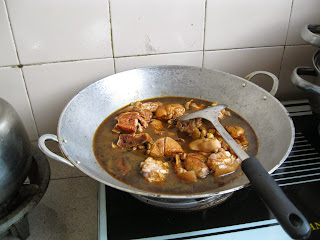
Picture 11. The finished product !  The mystery of cooking this dish is uncovered.
After eating this dish, I would say that it tastes better than the ones sold outside. The sauce or soup tastes so good that we polish off the bowl. There is still one more bowl of the sauce left for tomorrow's dinner. I am looking forward to drinking it. The black vinegar is sour enough and the rock sugar is sweet enough and the dish is very balanced. Now, using the notes and the pictures, I can cook this dish myself. "If I can do it, so can you" , so said Martin Yan.
Initially, I thought that cooking the "Black Vinegar Pig's Totter" was very difficult and complicated, but after seeing how mummy did it, it was so simple! I am slowly overcoming my fear of cooking. If mummy can do it, and I have recorded it, then I can do it too! Anybody wants to eat "Black Vinegar Pig's Totter" for dinner?  I'll cook for you. I'll put in an extra piece of rock sugar.


Pa.

29/10/2013

Kim Kua Pung -- Pumpkin Rice

Hi there,

Today, 28th Oct. 2013, mummy did her second cooking and secretly I felt very elated knowing that she was on her way to full recovery. Her appetite has improved tremendously and she is enjoying her food immensely.  She is even enjoying her sambal-balacan with her rice! Annette roasted some balacan the last time she came back and kept some extra balacan in a sealed Brand's small bottle. I blended some red chilli with the balacan and kept it in the fridge.  Each time she wanted the sambal-balacan, I would scoop a few teaspoonfuls into a small bowl and squeeze half a lime into it.  She loves the sambal-balacan to go with her rice.  After her detoxification last week, her appetite is even better. Praise the Lord!

Today, she cooked "Kim Kua Pung" or "Pumpkin Rice".  The ingredients are about the same as that of "Tua Chye Pung", but with a slight difference. The pork belly is not boiled, but uncooked. It is cut into thin strips like julienne to be stir fry with the other ingredients. The pumpkin is skinned, washed and cut into cubes. Make sure that the pumpkin is really ripe or matured so that it will be sweet and "powdery" when cooked.

Picture 1.  The ingredients are as follows: a piece of belly pork, a section of pumpkin, some dry prawns, two pieces or more of dry oysters, some fresh prawns and some shallots and garlic.
 To make your work easier, it is better to get all the ingredients peeled,washed, cut and put aside so that when it is time to cook, you will have ALL the ingredients ready.  You can also measure the rice, wash it and put it aside to be cooked together with the rest of the ingredients.

Picture 2.  The rice is measured, washed and put aside to be cooked later with the other ingredients. Mummy usually would cook the rice for two meals as the trouble that she has taken to prepare all the ingredients is too much of a hassle to cook for just one meal. Normally she would just put the whole pot into the cooker again and just switch it on. Wah-la. Dinner is ready to be served!
  The belly pork is julienne, cut into small strips and put aside. There is no seasoning at all. The cut belly pork is to be cooked first and then the other ingredients are added.

Picture 3. The pork belly meat is cut into small strips.

                                                   
Picture 4. The pumpkin is peeled (with the special knife), washed and then cut into cubes.
Picture 5. The pumpkin is cut into small cubes and put aside ready to be added to the other ingredients.
When all the ingredients are ready, mummy will start cooking. The first ingredient that she put into the wok is the raw meat. She stir fry the meat until every piece is cooked and you can see some fat oil in the wok from the meat. If the fat oil is not enough, add a bit of cooking oil. Then add in the other ingredients. Mummy next put in the shallots and fry until aromatic. Then she put in the dry prawns, stir fry, follow by the fresh prawns, then the oysters and then the garlic. Next she adds some oyster sauce, some freshly ground pepper, a pinch of salt, a bit of soya sauce and fry the whole thing again. Then she put in the cut pumpkin cubes and finally the rice. Then she toss the whole mixture and give it a good stir. Then she add in a bowl of water sufficient to cook the pumpkin rice. She let the whole thing boil for some time before she scoop the whole thing into the pot. Then she transfer the pot into the cooker and switch it on. Done!

The following are some pictures to show the various steps to fry the all the ingredients.
Picture 6. Fry the cut meat first. Some fat oil could be seen.
Picture 7. Then add in the other ingredients like dry prawns, oysters and fresh prawns. At this stage you can put in the soya sauce, oyster sauce, salt and pepper.
Picture 8. Finally you can put in the cut pumpkin and the washed rice and fry together before you pour in the water to cook the pumpkin rice.
Picture 9.  The half-cooked pumpkin rice is then scooped into the rice cooker's pot with the spatula.
Picture 10.  The pot is then put into the rice cooker and switch it on. In less than 10 minutes, the pumpkin rice is cooked.
Picture 11. Dinner is served. Although the plate may look piled up into a big heap, but most of it is pumpkin. The pumpkin rice is really delicious. The sambal- balacan is in the middle of the picture. I don't like balacan. It is not my thing.
 Pa.

27/10/2013

Tua Chye Pung.

Hi there,

Yesterday, 26th October, 2013, mummy cook "Tua Chye Pung" for dinner. I had taken some photos and I would like to record how she did it, so that you all can learn from it. The recipe was from my mother, but mummy modified it to suit her taste. I love mummy's recipe. It is simple and easy to cook. You will need the following ingredients:
(1) Tua Chye. The type that you used for Chye Boi.
(2) A slice of pork belly meat. Boil in a pot until soft. Retain the stock for cooking the rice. The cooked pork is the julienne and set aside.
(3) Dried prawns. A handful, wash and put aside. Do not soak in water. Lose its sweetness.
(4) Dried oysters. Mummy loves them. Soak 6 or 7 pieces in water earlier, to soften them.
(5) Fresh prawns,  a small cup, for a tastier and sweeter taste.
(6) Rice, measured and washed in a big sieve to be fried together with the ingredients.
(7) Shallots and garlic for taste. Peeled, washed and cut.

Picture 1.  The Tua Chye is cut and soak in water to remove any residual insecticide. The vegetable must be rinsed a few times before they are added to the rice.
Picture 2. Dried prawns. Just wash a few times and put them aside. Do not soak in water or they would lose their sweetness.
Picture 3. Soak a few dried oysters in water much earlier so that they would be soft enough to cook when the time comes.
Picture 4. A slice of pork belly meat that has been boiled in a pot until soft and tender. The meat is then julienne and put aside.
Picture 5. A small bowl of fresh sea prawns to sweeten the rice.
Picture 6.  Measure the right amount of rice, wash it and put it aside.
Picture 7. Peel a few shallots and garlic, wash and cut and put aside.
Now, all the ingredients are ready. Take a clean wok, put some oil and fry the shallots and garlic first. Then put in the dry prawns, fry until aromatic. Then add in the dry oysters, follow by the fresh prawns, pork meat and stir fry, mixing all the ingredients properly. Add in some pepper and sesame oil for fragrant and taste. Then put in the rice and finally the vegetable. At this stage, pour in the pork belly stock and stir fry everything. Let the whole thing boil for a short while. Then scoop up the whole thing into the rice cooker and then cook like you would with the normal rice.


Picture 8.  Stir fry everything and mix well. Then add in some salt, pepper and sesame oil for taste.
Picture 9.  Scoop everything into the rice cooker pot and then cook like you would with rice.
Picture 10.  Then cook everything in the rice cooker. Make sure the water (or the pork stock) is sufficient.
Picture 11.  Done! The Tua Chye Pung is ready to be served.
Picture 12.  Dinner is served!
 With this pictorial description,  I think it would be quite simple to cook this dish. And with a bit of imagination,  a slight change of ingredients to suit your taste-buds, you can cook practically anything that you fancy.  You can cook long beans rice (Chye Tao Pung), Pumpkin rice (Kim Kua Pung) and even chicken rice.  Come to think of it, cooking isn't that difficult after all, especially if you are cooking it for your own self.  When there is nobody to criticize you nor degrade you, then you are good to go.  To me, as long as the food is properly cooked, it is good to go.  I hope you all like this "Tau Chye Pung" as much as I do. This is a typical Hokkien dish.

Pa.

23/10/2013

Tau-Cu Fish - Mummy's Style.

Hi there,

Today, mummy taught me how to cook tau-cu fish. I have taken a few photos of the ingredients and I hope that I'll be able to transfer them to my blog by myself. Keeping my fingers crossed!
As shown in the picture below, the main ingredients are:
(1) Two slices of fish (Grouper)
(2) Taucu (whole beans, not smashed), one tablespoon or slightly more. Taucu is very salty by itself. No need to add salt.
(3) Green chilli, one or two. Red chilli is NOT the same. Use green chilli.
(4) Some shallots. Cut into slices.
(5) Three cloves of garlic. Cut into slices.
(6) Old ginger, julienne it. Use a big piece.

Picture 1.  These are the ingredients that you need to cook "Taucu Fish".
Prepare all the ingredients and put them aside. Then you must dry the fish with a paper towel, before coating it with corn flour. Make sure the fish is dry before you coat it with corn flour. This will prevent the fish from sticking on the wok. Then your fish will be a mess and the dish will not look nice. If the fish is dry (with a paper towel), then the corn flour will be dry and the fish will be easy to fry and easy to flip over. Make sure the fish is fried properly. It must be crispy on the outside and soft on the inside. When the fish is done, put it aside and clean the wok.

We want to continue with a clean wok to fry the shallots and garlic, follow by ginger and then green chilli. Now would be the best time to control the flame so as not to burn the shallots and the garlic. Fry the whole thing for a few minutes until you get the aromatic smell. Then add in the taucu, not too much, as the taucu is very salty. Fry until you get the smell. Then pour in a cup or two of water. Now increase the flame. Stir the whole thing and let it boil for a few minutes.

Finally put in the fish, and let it boil for a few minutes and let the sauce permeate into the fish. Then you can scoop up the fish and the soup into a bowl and serve.
Picture 2. The shallots and garlic are sliced, the ginger is julienne and the green chilli is cut roughly into rings. Notice the ceramic knife which I bought for RM99, promotional price, otherwise it would cost RM139. Our friend bought one from Japan for RM200. It is always very sharp. No need to sharpen it. It is used for cutting only, fruits and meat, but NOT bones.
Picture 3. Fry all the ingredients, starting with the ginger until aromatic, follow by the shallots then the garlic. After that the green chilli and finally one tablespoonful or slightly more of the taucu, depending on the amount of fish.  Be careful not to put too much taucu, as it is very salty. Fry until aromatic. Then add water.


Picture 4.  Fry the ingredients until aromatic, then add one or two cups of water and let it boils for sometime.

Picture 5.  Finally,  the fish is added when the water has boiled for some time.

Picture 6. Scoop up the fish and the sauce into a big bowl and garnish with some Chinese celery (daun soup).  Serve.
I love this dish and it goes very well with white rice. This dish alone is sufficient for my meal. The best fish to cook with this dish is "Ma Yeow Yee" (in Cantonese). "Goh Hee" in Hokkien.

Pa.


17/10/2013

Otak-otak -- Taiping Lang Style

Hi there,

There are many ways to prepare "Otak-otak", a dish reputed to originate from the Nyonyas. However, mummy's style is from her mother from Taiping, so I named this dish, "Otak-otak -- Taiping Lang Style".  So I will show the ingredients and the methods used by mummy in pictorial form.  The pictures are self explanatory and just by looking at the pictures, you will understand how to cook this dish. There is no hard and fast rules here. If not all the ingredients are available, never mind. As long as the main ingredients are there, then the dish would taste like the real thing. The main ingredients are:
(1) Fish. Any type of fish will do, as long as there are not too many bones.
(2) Gado-gado leaves. This is a must, in order to get that special taste. Some people don't like the smell of this type of leaves. Then they have not experienced the real otak-otak - Taiping Lang style.
(3) Spices: Lemon grass, gelangga, yellow ginger (Not too much!), small onions, candle nuts, dried chilli, and coconut suntan.  The amount of spices is up to individual taste.

 
The following pictures should give you an idea of how to cook "Otak-otak" I start it off, by showing you some of the ingredients that you will need. Please read the captions to understand the procedure of cooking this dish.


Picture 1.  Small onions. These must be peeled and washed. Then put aside to be blended later.

Picture 2.  You will also need dry chilli, candle nuts and fresh yellow ginger.

Picture 3.  This is Galangga. Choose the young shoots. Clean, peel and cut into smaller pieces for easy blending.

Picture 4. You will need RM2.00 fresh coconut milk.


Picture 5. You will need 6 sticks of lemon grass. Clean and cut into smaller pieces for easy blending.


Picture 6.  You will need some ordinary white rice, about half a cup, to be blended into liquid. Washed and put aside.

Picture 7. Boil the dry chilli until soft for easy blending. Remove the seeds if you don't want the dish to be too hot.

Picture 8.  This shows you the size of the fresh yellow ginger that you will need, and no more.

Picture 9.  This shows you the cut lemon grass, yellow ginger and galangga, for easy blending.

Picture 10. The small onions peeled and washed, ready to be blended.

Picture 11. This is the small blender that I used. I am blending the hard ingredients first, the lemon grass, candle nuts, yellow ginger, galangga and the small onions.The washed rice can be blended separately to get a better result.

Picture 12. This is the result of the first blending of the spices.

Picture 13.  Blending the dried chilli that has been boiled and some of the seeds removed.

Picture 14. The result of the blended chilli. Just use what you need, the rest can be stored and used later for something else.

Picture 15. This is the fish that we are going to use. About 1.5kg grouper from the main market. Remember, if you want to cook a bigger fish or more, you must also increase the other ingredients too.

Picture 16. Mummy asked me to fillet the fish and just use the flesh without the bones. Easier to eat.  Less messy.

Picture 17. Cut the fillets into smaller pieces for easy picking.

Picture 18. This is the "Daun Gado-gado" that must be used to get the typical flavour, aroma and taste of Otak-otak. Without these leaves, the taste is not there. Some people may not like the taste of these leaves.

Picture 19. You can grow this plant quite easily in a pot. It is a creeping plant. You can see the vine below the pot. Grow a few pots if you like. The plant will take some time to grow new leaves, once you harvest them for your Otak-otak.

Picture 20. The fillets have been cut into bite size and put aside.

Picture 21. The blended spices and all the other stuff are put into a mixing bowl and stir.

Picture 22. Add in the coconut suntan into the mixture and stir.

Picture 23. The mixture is been stirred slowly as the coconut suntan is been added.

Picture 24. Don't forget to add some salt!

Picture 25. Now you can add in the chilli according to your taste. Less chilli if children are eating too.

Picture 26. After adding the chilli, stir the mixture well.

Picture 27. Crack an egg, beat it and add it into the mixture. You can skip this egg if you don't like eggs.

Picture 28. Beat the egg good and proper.

Picture 29. Pour the egg into the mixture.

Picture 30. After adding the egg, stir the mixture again.

Picture 31. Now you can add in the fish pieces.

Picture 32. After adding in the fish, stir the whole thing again, so that the fish is completely coated with the spices.

Picture 33. Leave the fish to marinate for some time, say about half an hour to an hour.

Picture 34. Keep the marinating fish in the fridge for an hour or whenever you are ready to cook.

Picture 35. The fish in the fridge. Note the kefir drink by the side.

Picture 36. Line the steel plate with gado-gado leaves and arrange the fish pieces on top of the gado-gado leaves, around the plate.

Picture 37. Mummy arranging the fish on the steel plate, using a large spoon.

Picture 38. You can see the pieces of fish arranged on the steel plate on top of the gado-gado leaves.

Picture 39. The balance of the spices is then pour over the fish, covering them.

Picture 40. Then using a special tong, lift the steel plate and bring it to the steamer, as shown below.

Picture 41. Mummy putting the prepared fish into the hot steamer. You can start heating the steamer while preparing the fish, so that the steamer will be ready when you have finished preparing the fish..

Picture 42. Steam for half an hour to 45 minutes.

Picture 43. The finished product! Ready to be eaten!

Picture 44.  A close-up of the finished product.

Picture 45. Otak-otak on the table.

Picture 46. After saying graces, we are going to eat.

Picture 47. Annette is taking the first scoop of the otak-otak.

Picture 48. Mummy is taking the second scoop!
I hope you will try this out and enjoy this dish as much as we do. Whenever mummy cooks this dish, it is a real treat and we always look forward to eating it. If you have not any gado-gado leaves in your garden, don't worry. This is a very common "weed" which can be seen in the wild. If you are lucky, you may even find them in your neighbour's backyard.

Pa.